Thursday, March 22, 2012

My Creative Space - Thurs 22th March 2012

Today I can finally reveal some projects I've been working on now they have been given to their rightful owners.

I am really lucky and have a fabulous craft group I meet up with every Wednesday night. This year we decided to do a number of swaps to keep the creative juices flowing.

Our latest swap was an upcycle swap. The rules were pretty simple, make something old into something new and fabulous. Here is what I made:


For Julie
A knitting project bag

and a hot water bottle cover


For Makayla
A PJ Pillow (zips up at the back)


Plus this hot water bottle cover from this tutorial

I've also whipped up some more handcream, you can find the recipe here


P.S Don't forget to visit more creative spaces here

Friday, March 16, 2012

The Best Handcream Ever!!!

Coming up to 3 years ago now I found this recipe for Handcream, it looked fairly easy so I gave it ago. I have not purchased any other handcream since, it's AWESOME. I've converted a number of friends now to using it and it's had rave reviews from them.


100ml Olive Oil (I'm pretty sure you would be able to use other oils for this. No harm in trying!)
100ml Almond Oil

40gm Beeswax (I use Beeswax Pellets)
150ml Floral Water (I use Lavender)
2 pinches of borax or citric acid
2 x 250ml containers

Melt beeswax in 100ml of almond oil (in a double boiler) then take off heat and stir in the olive oil. It will go white as the cold oil hits the warm oil but just keep mixing and it will all blend together.

Also heat in a seperate double boiler the floral water and borax until it's hot too touch then take off the heat.

Using a stick blender gradually add the OIL to the WATER in a slow narrow stream. Do this part very slowly and make sure you do it in the right order.

Mix until it's the consistancy of a thick cream then add your essential oils.

Pop into a 250ml container and LEAVE THE LID OFF until it has cooled completely

That's it, seriously!!


Some things you need to know about this cream:
- The mixing time will depend on the weather, if it's really hot and humid I cheat and pop the bowl into the fridge for a few minutes to quicken up the setting process.

This cream will only last a few months due to the fact it's not loaded with heaps of crap :), but in saying that I have had pots last over six months until I finished it.

If the oil starts to seperate just mix it all in together again

This is not the sort of cream you can slab on and run out of the door. It is quite greasy compared to store brought creams so give it a few minutes to soak in but my god your skin will love you forever for using it.


Thursday, March 15, 2012

My Creative Space - Thurs 15th March 2012


This week it's been all about Waldorf Dolls. On Sunday I had a few friends over to make some dollies. We had an absolute blast and while the dolls are still in progress I can not wait to see them finished. They are all looking pretty amazing and each has their own personalities coming out at each stitch.

My girl is turning 4 next month (yikes!!!!!) so I'm making her another doll. Well actually that's a lie, I'm making two. A boy and girl. This one here will be called Fern, she is inspired by the colours of my garden and I can not wait to finish her.

I really love making these dolls and seeing the features evolve as I progress along. Not 100% decided on the eye colour yet. I guess that will come to me over the next few days ♥


For more creative spaces pop on over to here


Thursday, March 8, 2012

My Creative Space - Thurs 8th March 2012


Many moons ago I started a Hexagon Blanket, this has been in the WIP pile for quite some time while I decided what to do with it.

Earlier this year I finally made a decision and got cracking with my new plans.

I'm pretty happy how it's coming together, but my god there's a heap still to do. My girl keeps asking when it will be finished so I had better keep chugging away and hopefully have it finished this winter (more than likely the end of winter knowing my luck).


For more creative spaces pop on over to here

Saturday, March 3, 2012

Upcycle Project 1 - Hot Water Bottle Cover


Once you have used a hot water bottle you will never want to use anything else. There is something truly comforting in that nice warm sensation as you snuggle a hot water bottle. But of course they need to be covered, there's certainly nothing comforting in snuggling a lump of rubber lol.

This project is super easy and can be made with an old blanket, or jumper or anything that is snuggle worthy.

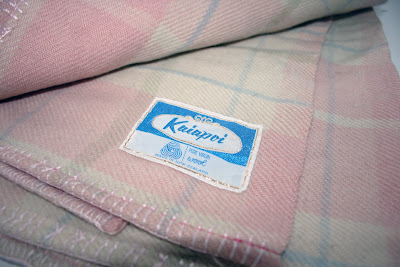
For this tutorial I am using an old woolen blanket we were given years ago from The Man's Nana. We ended up with about 12 of the things so I'm sure I can use a few for projects about the house.

You will need:

1 x old woollen blanket (pure wool) or jumper

1 x Hot Water Bottle

1 x Washing Machine (for the felting process)

Paper for making a template (can use newspaper if need be)

Marker

Scissors

Sewing Machine (of course you can hand sew it and if it’s felts thick enough it looks super cool sewn together with blanket stitch)

Fabric, Old Sheet, Felt, crochet circle, crochet flowers, doilies. Anything really for embellishing

This is how I make mine

Felt your woollen blanket or jumper in your washing machine. I find this works best in a front loader. Simply pop your item in your machine, turn onto your hottest setting, add some laundry power and wash. Once washed check to see if the fabric feels a bit denser than prior to washing it. If yes and you are happy with it either hang out to dry or dry in the drier (I know, naughty J)


Make a template of your hot water bottle by tracing around it onto a piece of paper (newspaper works well too)

Add 2 cm’s around the whole template. This will be referred to as Piece 1


Now join the dots (note I have made a slight change to the shape at the top)


Copy this template two more times onto another piece of paper and cut out.

Measure 24cms from the top of Piece 2, rule a line a cut along this line. Now measure 21cmx from the bottom of Piece 3, rule a line and cut. You will now have 3 piece that look like this:


Place Piece 1 on your felted blanket (or jumper). Either pin down or mark with a fabric marker around the outside, then cut out. Repeat with Piece 2 and 3

Now it’s time to embellish template 1. I’ve used an old sheet here and appliqued a flower onto it with a button in the middle


Once you have finished embellishing take Pieces 2 and 3, fold over each edge by 1cm and pin down

Now sew along where you have pinned

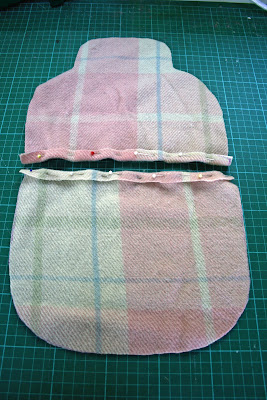
Lay Piece 1 face up, grab Piece 2 and lay on top of Piece 1 face down as per the photo


Now grab Piece 3 and lay on top of both Pieces as per the photo. The two edges previously sewn will overlap.


Pin it all together and sew right around the edge


Snip the corners. This helps to make the corners nice and round. Be careful not to snip your sewing though ;)


Snip off any loose pieces of cotton, fold out the right way through the opening and you are done

Enjoy!


Thursday, February 23, 2012

New Crafting Space

Along with adding to our family last year, we also added a pair of sheds to our back yard. Each shed measures 2.4m x 3m and have been named simply 'his' and 'hers'

Mine is of course for all my crafting endeavours. I spent many months researching ideas and feel I have achieved the perfect little hideaway in my back yard.


Under this shelving I can fit a whopping 10 60ltr containers. Just enough I reckon!

The man of the house hasn't quite finished his yet, but will be a great space for him to paint in.

Between the two of them we have built a wee garden for the girls called 'Fairyland'. Then on the other side of mine is the girls sandpit and a wee playground for them is on the other side of the man's shed.

I really love that in years to come I can hopefully potter around my little shed while the girls do their thing in the garden. So far so good with the eldest but it may be a bit different once the littlest is mobile and there's two of them out and about in the garden :)


Wednesday, February 22, 2012

Why Hello!


Oh my goodness I can't quite believe it's been nearly a year since I last blogged. Shocking!!!!

I have a good reason though, we celebrated the birth
of a new addition into our household in September. Now I know some fellow bloggers still manage to blog, but I do believe they are channeling some super power that no-one has told me about. Firstly I lost all my crafting mojo at the start of last year. Thankfully it is now back in full force but crikey I was worried there for a second.

Here is a photo of our lovely new daughter, Eden Nova. Born 16th September 2011

This photo was taken last week :)


I've also finally decided on a new name. Took me forever but then Jodulbug Creations popped into my head. Jodulbug is a nickname my brother calls me, has done since I was a baby. No idea why I never thought of using it before, but I guess good things to take time lol!

Hopefully you may have also noticed that I've gone all flash and got me a domain name. Super cool huh? I really hope I set everything right so followers of Crazy Crafter should be directed here, but I have been informed by a couple of people that some random has been posting on Crazy Crafter but I'm hoping that's all fixed now.

Well I guess I had better be off and work on a tutorial I'm planning

Hope you are all well, and look forward to catching up in bloggyland over the next few weeks


P.S - Please excuse the shoddy artwork at the top. My brain is not running at maximum so it's taking awhile to remember how to make a graphic ;)